玩转树莓派 Raspberry Pi 开源硬件
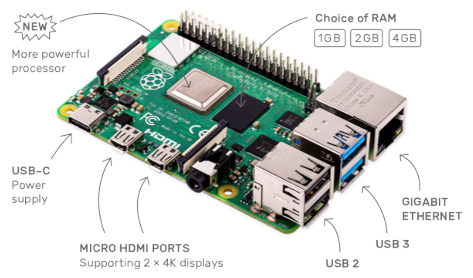
万众期待的 Raspberry Pi 5 终于发布,之前由于产品原型的需要,一直计划采购 3B+,后来供应商透露新版 4B Model B 性价比更佳,所以稍微等待了一段时间,终于在最近拿到了一块 2G 内存的 Raspberry Pi 4B Model B 板子。一直以为 4B 只会简单的更新一下 SoC 并增大 DDR 容量,但是实际上还带来了 Type-C、Bluetooth 5.0、Micro HDMI、USB 3.0 乃至 DDR4 等诸多崭新升级。而官方推荐的应用范围,开始从教育渗透至工业领域,逐步发展为一套完整的嵌入式生态链。
![]()
本文基于树莓派基金会官方提供的文档资料 《Raspberry Pi
Documentation》
撰写,笔者翻译了其中较为常用的章节内容,便于读者拿到板子之后能够快速上手,并避免使用一些官方不推荐的操作与工具库。此外,本文也会涉及
OpenCV、dlib 的编译,人脸识别以及
Electron
在树莓派上的部署等话题。全文将会伴随我使用树莓派的经验而长期进行更新,欢迎各位树莓派爱好者朋友持续关注与勘误。
板载资源
开始树莓派正式的应用之前,您需要拥有一张至少 8GB class 4 或者 class
10 的 microSD 卡、带有标准 HDMI 的显示器以及 Micro HDMI 接口线缆、标准
USB
接口的键盘与鼠标、输出电压至少为5V电流至少为2A的优质电源。
系统安装
树莓派操作系统可以通过 NOOBS 工具软件、直接烧录镜像至存储卡两种方式进行安装,初次使用官方建议使用 NOOBS 方式安装,并采用官方基于Debian 10 buster发行版的 Linux 桌面操作系统Raspbian buster。
NOOBS
NOOBS(新的开箱即用软件,New Out Of Box
Software)是树莓派提供的一种简单便捷的操作系统安装管理工具,可以通过树莓派官方下载网站进行获取,目前最新的版本为
2019 年 7 月 10 日发布的NOOBS_v3_2_0。
1 | D:\Embedded\Raspberry Pi\NOOBS_v3_2_0 |
首先,使用 SD 协会协会官方提供的SD Memory Card
Formatter将 microSD 卡格式化为FAT(包括 FAT16 和
FAT32)文件系统,然后将下载完成的NOOBS_v3_2_0.zip压缩文件进行解压,并将所有内容拷贝至
microSD 卡的根目录,然后将存储卡插入到树莓派上电启动。首次引导时,FAT
分区上的RECOVERY将自动调整至最小,并显示当前可供安装的操作系统列表。
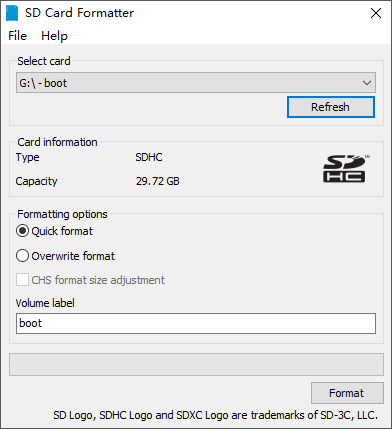
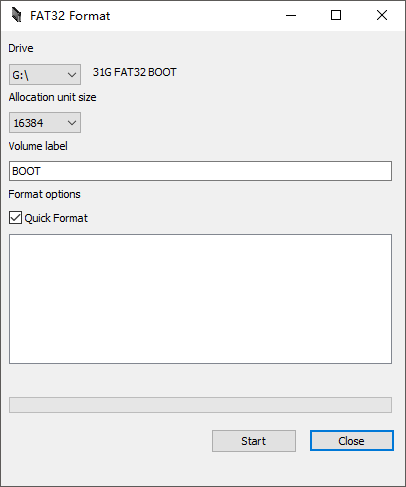
如果 microSD 容量为 64G 或者超过 64G 的SDXC 类型存储卡,SD Memory Card Formatter 工具总是会将其格式化为exFAT类型,由于树莓派的 bootloader 内置于 GPU 当中,只支持从 FAT 文件系统上读取数据,因此这里需要使用到一款第三方格式化工具FAT32 Format将其格式化为FAT32类型。
树莓派官网上下载的 NOOBS 和 NOOBS Lite 分别是指离线和在线安装版本,前者包含了完整的 Raspbian 操作系统,无需网络也可以正常进行安装,而后者则需要联接网络进行下载。
镜像安装
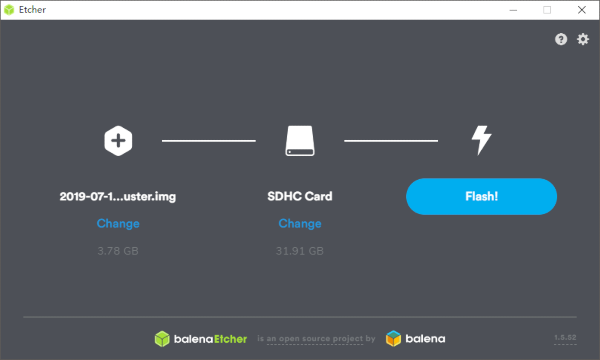
首先,通过树莓派官方下载网站获取最新的2020-02-13-raspbian-buster.img镜像,然后下载镜像烧录工具balenaEtcher,选择镜像文件和
microSD 盘符以后点击【Flash!】,microSD
烧录完成以后重新插入树莓派上电启动。
如果上电后发现树莓派 4 无法启动,那么有可能是 SPI 接口的 EEPROM 被损坏,此时请尝试拔出 microSD 卡后断开电源,然后重新插入上电,如果绿色的 LED 依然没有闪烁,那就需要对 EEPROM 重新进行刷写。到树莓派官方网站下载
rpi-boot-eeprom-recovery-2019-05-10.zip恢复工具,将其解压至 FAT 格式的 microSD 卡根目录后,然后插入树莓派重新上电等待绿色 LED 开始闪烁。
更换软件源
由于官方软件源的下载速度过慢,这里推荐使用清华大学提供的国内软件源,可以通过输入如下命令进行设置。
1 | ➜ sudo vi /etc/apt/sources.list |
注意:完成后别忘记执行
sudo apt-get update更新软件源设置。
工具安装
安装生产力工具:
1 | ➜ sudo apt-get install cmake nginx autoconf git goldendict terminator guake tree tmux build-essential vim p7zip wireshark filezilla kchmviewer emacs uget audacious alacarte vlc okular putty ddd fcitx-table-wbpy whois calibre vokoscreen chromium-browser inkscape gimp flameshot tilix arduino firefox-esr wiringpi |
安装虚拟键盘:
1 | ➜ sudo apt-get install matchbox-keyboard florence |
安装文泉译正黑字体:
1 | ➜ sudo apt-get install ttf-wqy-zenhei |
安装与升级
升级 Raspbian 软件源,并且更新应用程序:
1 | ➜ sudo apt upgrade |
卸载 Raspbian 的系统组件:
1 | ➜ sudo apt -y purge "xxxxx*" |
更新 Raspbian
操作系统版本,需要先修改/etc/apt/sources.list和/etc/apt/sources.list.d/raspi.list文件里的版本名称,然后执行如下命令:
1 | ➜ sudo apt update |
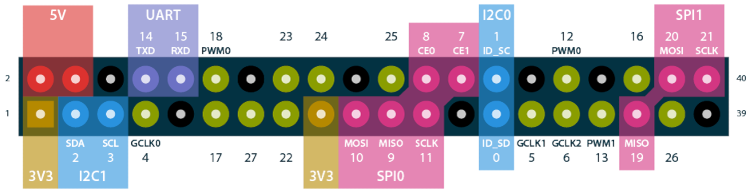
GPIO 详解
树莓派的最大强大的特性在于拥有一个 40 针的原生 GPIO(General-Purpose
Input/Output)接口,其中 2 个5V和 2
个3.3V引脚,以及 8 个不可配置的0V接地 GND
引脚。

处于输出模式时,其它引脚可以输出3.3V高电平以及0V低电平。处于输入模式时,通过内置的上下拉电阻,可以读取3.3V或者0V的输入信号;其中
GPIO2 和 GPIO3 拥有固定的上拉电阻,其它引脚则可以通过软件进行配置。

除了简单的输入输出以外,这些原生的 GPIO 引脚还可用于如下复用的功能:
- PWM:所有引脚都可以通过软件配置为 PWM,其中
GPIO12、GPIO13、GPIO18、GPIO19具备硬件 PWM 功能。 - SPI:可配置为
SPI0(
GPIO10/MOSI、GPIO9/MISO、GPIO11/SCLK、GPIO8/CE0、GPIO7/CE1)和 SPI1(GPIO20/MOSI、GPIO19/MISO、GPIO21/SCLK、GPIO18/CE0、GPIO17/CE1、GPIO16/CE2)共 2 路 SPI 总线。 - I2C:
GPIO2为数据总线 SDA,GPIO3为时钟总线 SCL,而GPIO0和GPIO1分别为 EEPROM 的数据和时钟总线。 - Serial:
GPIO14和GPIO15分别为串行发送信号 TX 和串行接收信号 RX。
树莓派官方的 Raspbian
操作系统提供了pinout命令工具,其底层由 Python 库 gpiozero
实现,并且已经默认安装至 Raspbian 系统镜像。
1 | ➜ pinout |
注意:关于树莓派 GPIO 更为详细的用法可以查阅交互式 pinout 图表,该网站为每个引脚提供了详细的说明以及相应的示例程序。
config.txt 启动配置
Raspberry Pi 使用一个配置文件config.txt代替了传统计算机
BIOS 的功能,该文件会在启动阶段被树莓派上的引导固件读取(由 GPU 在 CPU
和 Linux 初始化之前执行),所以它被放置在了存储卡的第 1 个引导分区。
但是该文件同样可以在登入 Raspbian
系统之后,通过编辑/boot/config.txt文件执行修改操作,所有设置都会在
Raspberry Pi
重新启动以后生效。此外,还可以执行下面命令查询当前系统当中已经生效的选项情况:
1 | ➜ vcgencmd get_config <config> |
raspi-config 管理
raspi-config是最初由 Alex Bradbury
编写的树莓派配置工具,现在也可以选择选择使用图形化界面的【树莓派配置应用程序】。
1 | ➜ sudo raspi-config |
配置触摸屏分辨率
使用微雪 7 寸
IPS 电容触摸屏时,如果需要将分辨率设置为1024 ×
600,可以打开树莓派 TF
卡根目录下的config.txt文件,并向最后添加如下配置项目;完成后保存,并将
TF 卡插回到树莓派,重新上电即可。
1 | max_usb_current=1 |
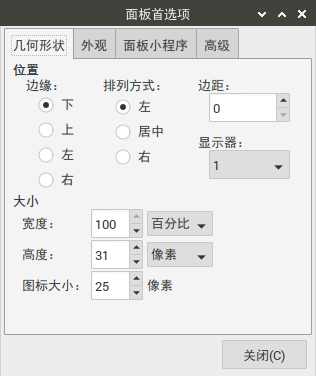
最佳桌面显示配置
针对外接的1920×1080分辨率显示屏幕,采用如下一系列的显示设置可以获得良好的用户体验。
基础颜色
Raspbian 菜单以及字体的配色:
- 背景灰
#42413C; - 字体白
#E8E8E8;
显示设置
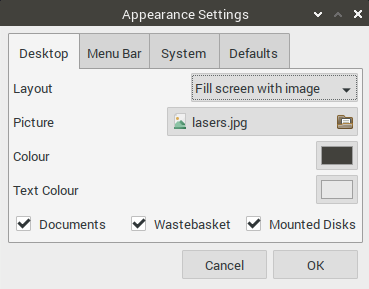
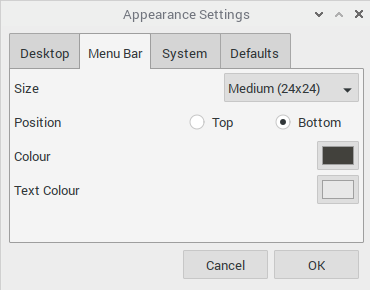
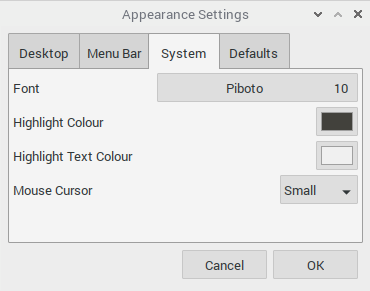
面板首选项
处理显示器黑边
执行如下命令编辑/boot目录下的config.txt文件。
1 | ➜ sudo vim /boot/config.txt |
取消disable_overscan = 1前面的#号注释,然后重新启动系统。
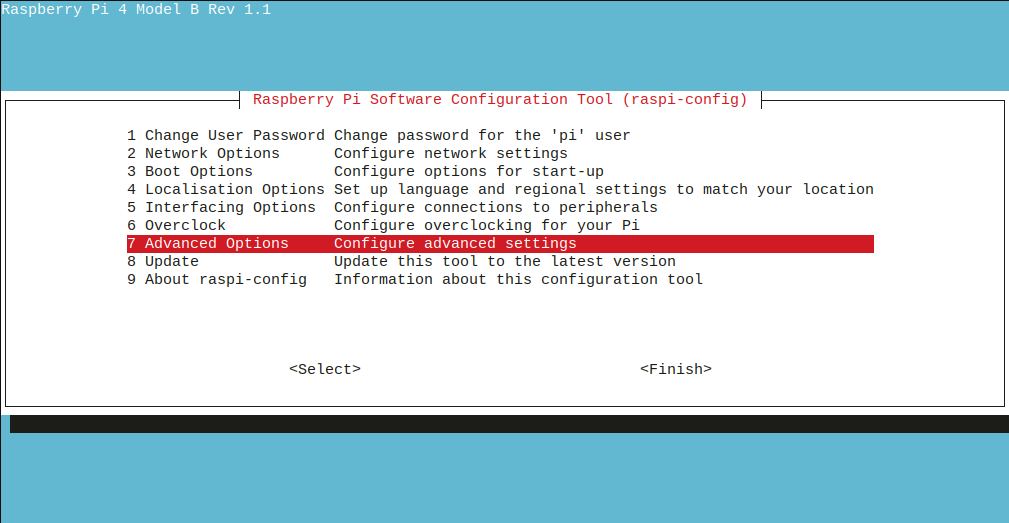
注意:也可以通过
sudo raspi-config进入树莓派软件配置工具,选择【7 Advanced Options】下面的【A2 Overscan】选项同样可以解决该问题。
禁止屏幕休眠
禁用图形界面休眠
在/etc/profile.d路径下新建一个hibernate.sh脚本,然后写入下面的命令并且保存,就可以永久禁止显示屏幕在图形界面下被休眠。
1 | xset s off |
除此之外,更多常用的设置如下面的表格所示:
| 指令 | 说明 |
|---|---|
xset s off |
禁用屏幕保护 |
xset s 3600 3600 |
设置空闲时间为 1 小时 |
xset s off -dpms |
禁用 DPMS(Energy Star)并阻止屏幕进入空闲 |
xset -dpms |
禁用 DPMS(Energy Star)特性 |
xset dpms force off |
立即关闭屏幕 |
xset dpms force standby |
强制屏幕进入待命状态 |
xset dpms force suspend |
强制屏幕进入暂停状态 |
禁用命令行休眠
Raspbian 与其它 Linux 发行版一样拥有 7
个工作组,其中tty1 ~ tty6为命令行模式,而tty7则为图形界面模式。按下键盘的Ctrl + Alt + F1 ~ F7组合键可以轮流进行切换。进入tty命令行模式以后,通过如下命令可以在本次会话范围内禁用休眠。
1 | ➜ setterm --blank 0 |
重启 Raspbian
之后,该命令就会失效,所以通常需要将该命令添加至开机自启动脚本/etc/bash.bashrc里面。除此之外,终端属性设置命令setterm还拥有如下常用参数:
1 | setterm -blank [0-60|force|poke] |
当上述命令的参数为0时即表示禁用,例如禁止屏幕进入保护与关闭状态:
1 | ➜ setterm -blank 0 -powerdown 0 |
连接隐藏 SSID 的 WiFi
编辑 Raspbian 的
wpa-supplicant配置文件:
1 | ➜ sudo vim /etc/wpa_supplicant/wpa_supplicant.conf |
连接隐藏 WiFi
时必须将scan_ssid设置为1;此外
priority
表示连接优先级,数值越大优先级越高,但不能设置为负数。
1 | network={ |
安装 VSCode 编辑器
下载并安装树莓派
VSCode以后,采用以下命令避免执行sudo apt update时出现公钥缺失提示信息。
1 | ➜ wget https://packagecloud.io/headmelted/codebuilds/gpgkey -O - | sudo apt-key add - |
Qt 安装与编译
可以通过命令方便的下载安装 Raspbian
官方仓库当中的预编译版本,截止至本文撰写的 2020 年 3 月 14
日,官方仓库默认安装的版本为Qt Creator 4.8.2以及基于GCC 8.3.0 32bit的Qt 5.11.3。
1 | ➜ sudo apt-get install qt5-default qtcreator |
如果当前运行的是一个基于 Qt5 编写的人脸识别项目,由于需要调用 Raspberry Pi 的蓝牙与摄像头设备,那么在按照上面步骤安装完 Qt 之后,还需要额外安装如下蓝、多媒体依赖库:
1 | ➜ sudo apt-get install bluez libbluetooth-dev qtmultimedia5-dev qtconnectivity5-dev |
如果需要安装最新的Qt 5.14.2,则需要前往Qt
源码仓库下载qt-everywhere-src-5.14.2.tar.xz和qt-creator-opensource-src-4.12.1.tar.xz的源码手动进行编译安装:
扩大 Swap
交换分区存储空间,将CON_SWAPSIZE=100修改为CON_SWAPSIZE=1024:
1 | ➜ sudo vim /etc/dphys-swapfile |
注意:编译安装过程参考了《微雪树莓派 Qt 开发环境搭建》、《Building Qt 5.12 LTS for Raspberry Pi on Raspbian》、《Build QtCreator on Raspberry Pi》三篇文章。
Qt 5.14.2
安装 Qt 源代码编译相关的第 3 方依赖库:
1 | ➜ sudo apt install build-essential libfontconfig1-dev libdbus-1-dev libfreetype6-dev libicu-dev libinput-dev libxkbcommon-dev libsqlite3-dev libssl-dev libpng-dev libjpeg-dev libglib2.0-dev libraspberrypi-dev |
将 Qt 源代码解压至workspace工作目录:
1 | ➜ pi@raspberrypi:/workspace $ tar -xf qt-everywhere-src-5.14.2.tar.xz |
Qt 构建是通过 configure 脚本配置的,但是平台和设备的特定设置是在 mkspecs 配置文件中设置的。Qt 包括用于 Raspberry Pi 的 mkspec,但是不幸的是,它们仅用于交叉编译环境,并且未经编辑或需要伪造交叉编译环境就不能用于本机构建,并且存在其自身的问题。
Qt
源码的编译是通过安装脚本进行配置的,但是平台和设备相关的设置都放置在mkspecs目录下:
1 | ➜ pi@raspberrypi:/workspace/qt-everywhere-src-5.14.2/qtbase/mkspecs $ ls |
Qt 虽然包含有用于 Raspberry Pi
编译的mkspec,但是仅用于交叉编译环境。如果需要在Raspberry
Pi上完成编译工作,就需要前往qt-raspberrypi-configuration下载国外爱好者编写的mkspec。
1 | ➜ pi@raspberrypi:/workspace $ git clone https://github.com/oniongarlic/qt-raspberrypi-configuration.git |
进入到qt-raspberrypi-configuration目录,然后执行make install,参数DESTDIR需要根据
Qt 源码的位置自行设定:
1 | ➜ pi@raspberrypi:/workspace $ cd qt-raspberrypi-configuration && make install DESTDIR=../qt-everywhere-src-5.14.2 |
Qt5 由许多模块组成,安装额外的开发包能够让 Qt
支持这些特性,下表提供了可选的特性以及所需的开发包。开发人员可以按需选择安装,然后检查configure命令的输出,确保安装脚本找到并启用了这些可选特性。
| 可选特性 | 所需安装包 |
|---|---|
| Bluez 蓝牙 | sudo apt-get install bluez libbluetooth-dev |
| GStreamer 多媒体框架支持 | sudo apt-get install libgstreamer1.0-dev libgstreamer-plugins-base1.0-dev gstreamer1.0-plugins-base gstreamer1.0-plugins-good gstreamer1.0-plugins-ugly gstreamer1.0-plugins-bad libgstreamer-plugins-bad1.0-dev gstreamer1.0-pulseaudio gstreamer1.0-tools gstreamer1.0-alsa |
| ALSA 音频支持 | sudo apt-get install libasound2-dev |
| PulseAudio 混音支持 | sudo apt-get install pulseaudio libpulse-dev |
| PostgreSQL、MariaDB、MySQL 数据库支持 | sudo apt-get install libpq-dev libmariadbclient-dev |
| CUPS 打印支持 | sudo apt-get install libcups2-dev |
| Wayland 支持 | sudo apt-get install libwayland-dev |
| X11 支持 | sudo apt-get install libx11-dev libxcb1-dev libxkbcommon-x11-dev libx11-xcb-dev libxext-dev |
| 无障碍环境 | sudo apt-get install libatspi-dev |
如果调用相机时出现Unknown module(s) in QT: multimedia multimediawidgets错误,则还需要手动安装如下模块:
1 | ➜ sudo apt-get install qtmultimedia5-dev |
新建影子编译目录build,在源代码树的外部编译 Qt
可以方便编译不同版本,并且出现问题时也便于重新进行编译:
1 | ➜ pi@raspberrypi:/workspace $ mkdir qt-build |
配置 Qt
的configure命令设置相应的编译参数,例如:所需的库、默认的
QPA
插件等等。下面的configure命令只是一个示例,开发人员需要按需对其进行调整,例如:需要
wayland,则需要移除-skip wayland选项。configure命令大约需要运行
10
分钟,因为它需要编译qmake然后运行各种测试与特性检查。
1 | PKG_CONFIG_LIBDIR=/usr/lib/arm-linux-gnueabihf/pkgconfig:/usr/share/pkgconfig \ |
接下来就可以开启 Qt 的正式编译过程了:
1 | ➜ pi@raspberrypi:/workspace/qt-build $ sudo make # CPU 单核编译 |
注意,完成之后需要对下面 3
个模块单独进行编译,否则后面make install安装时会报错:
1 | ➜ pi@raspberrypi:/workspace/qt-build/qtlocation/src/3rdparty/clip2tri $ sudo make |
如果编译出现错误,则需要检查是否正确安装了所有configure的依赖。接下来,将编译好的文件安装至/opt/qt-5.14.2目录下面:
1 | ➜ pi@raspberrypi:/workspace/qt-build $ sudo make install |
安装完成以后,可以从/opt/qt-5.14.2安装目录运行qmake,从而验证
Qt 是否安装成功:
1 | ➜ /opt/qt-5.14.2/bin/qmake |
上述构建默认使用 eglfs
平台,运行平台二进制文件时,可以通过-platform参数生成指定运行平台的二进制文件。
| 运行平台 | platform 参数 |
|---|---|
| X11 | -platform xcb |
| VNC | -platform vnc |
| WebGL | -platform webgl |
这里还有一些收尾的工作需要完成,将安装好的 Qt 5.14.2 设置为默认的 Qt 版本:
1 | ➜ pi@raspberrypi:/workspace/qt-build $ sudo vim /usr/share/qtchooser/qt5-arm-linux-gnueabihf.conf |
修改qt5-arm-linux-gnueabihf.conf,将内容替换为如下配置项:
1 | /opt/qt-5.14.2/bin |
接着,修改.bashrc用户环境变量:
1 | ➜ pi@raspberrypi:/workspace/qt-build $ sudo vim ~/.bashrc |
然后在.bashrc环境变量最后添加如下内容:
1 | export QT_SELECT=qt5-arm-linux-gnueabihf |
执行source ~/.bashrc命令使环境变量生效,最后直接运行qmake命令检查配置是否生效:
1 | pi@raspberrypi:~ $ qmake -v |
Qt Creator 4.12.1
首先,解压下载好的qt-creator-opensource-src-4.12.1.tar.xz源代码:
1 | ➜ pi@raspberrypi:/workspace $ tar -xf qt-creator-opensource-src-4.12.1.tar.xz |
然后,在工作区建立影子编译目录qt-creator-build:
1 | ➜ pi@raspberrypi:/workspace $ mkdir qt-creator-build |
进行影子编译目录qt-creator-build,运行qmake生成
Makefile 文件,然后让 CPU 进行多核编译:
1 | ➜ pi@raspberrypi:/workspace/qt-creator-5.14.2 $ sudo /opt/qt-5.14.2/bin/qmake -r ../qt-creator-opensource-src-4.12.0 |
最后,编译完成之后,将 Qt Creator 安装至 Raspbian
操作系统的/opt/qt-creator-5.14.2目录下面:
1 | ➜ pi@raspberrypi:/workspace/qt-creator-5.14.2 $ sudo make install INSTALL_ROOT=/opt/qt-creator-5.14.2 |
命令行让 Qt Creator 在 X11 下启动,以验证安装是否成功:
1 | /opt/qt-creator-5.14.2/bin/qtcreator -platform xcb |
将 Qt Creator 的引用添加至 Raspbian 的启动菜单:
1 | sudo cp /opt/qt-creator-4.12.1/share/applications/org.qt-project.qtcreator.desktop /usr/share/applications/ |
获取设备 IP
当计算机采用 SSH 或者 VNC 连接至 Raspberry Pi 时,需要首先获取树莓派的 IP 地址。
1 | ➜ hostname -I |
采用nmap网络扫描工具可以发现当前局域网上设备的 IP
地址,首先需要进行安装:
1 | ➜ sudo apt install nmap |
然后在局域网使用nmap命令并携带-sn参数进行
Ping 扫描,该命令会尝试ping连接所有的 IP
地址,以查看其是否响应,最后输出所有响应设备的主机名称与 IP 地址:
1 | ➜ nmap -sn 192.168.3.0/24 |
注意:
192.168.1.0/24表示当前扫描的 IP 地址范围为192.168.1.0 ~ 192.168.1.255。
设置静态 IP
Raspberry Pi 通过 dhcpcd 守护程序配置网络设备的
TCP/IP,可以自动分配 IP 地址、设置网络掩码以及 DNS
解析。默认情况下,Raspberry Pi 会尝试通过 DHCP
自动配置所有网络接口,如果失败则回退到169.254.0.0/16范围内的自动专用地址,这与其它
Linux 发行版和 Microsoft Windows 的行为保持一致。如果不希望使用 DHCP
的自动配置,而改为手动进行静态配置,则可以修改sudo vi /etc/dhcpcd.conf配置文件:
1 | # Allow users of this group to interact with dhcpcd via the control socket. |
向上述配置文件中添加如下内容,即可完成静态 IP 的设置:
1 | interface eth0 |
执行ip link命令可以查看当前 Raspberry Pi OS
上存在的网络接口,即上面配置中首行的interface xxxx。
1 | pi@raspberrypi:~ $ ip link |
除此之外,还可以执行ifconfig命令查看 Raspberry Pi OS
当前的网络配置情况:
1 | pi@raspberrypi:~ $ ifconfig |
注意:早期版本的 Raspberry Pi OS 使用
/etc/network/interfaces配置文件设置网络接口,如果在该文件当中列出了接口,则其中的设置将会优先于/etc/dhcpcd.conf当中的配置。
VNC 远程桌面
VNC 是虚拟网络控制台(Virtual Network
Console)的英文缩写,它是一款优秀的免费开源远程控制工具,由 AT&T
欧洲实验室开发。该工具主要包含vncserver、vncviewer、vncpasswd、vncconnect四个部分,但是通常情况下只需要使用到前面两者(分别为服务端和客户端),Raspberry
Pi 上可以通过如下命令直接安装:
1 | ➜ sudo apt install realvnc-vnc-server realvnc-vnc-viewer |
然后,在 Raspberry Pi
上启动图形桌面,选择【开始菜单】>【首选项】>【Raspberry Pi 配置】>【接口】;或者使用raspi-config在命令行中进行启用,依次选择【Interfacing Options】>【VNC】>【Yes】。
最后,在本地计算机安装VNC Viewer客户端,将树莓派在当前局域网中的
IP 地址填入地址栏,然后输入 Raspbian
的用户名与密码即可登入。
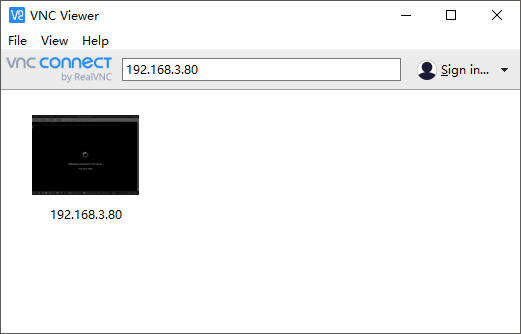
注意:虽然 RealVNC 提供的云服务功能经过简单注册以后即可使用,但是仅限于教育或者非商业目的。
SSH 连接会话
SSH(Secure
Shell)可以让同一局域网下的计算机远程访问 Raspberry Pi 命令行,Raspbian
默认禁用 SSH
服务器,需要通过图形界面下的【Raspberry Pi Configuration】>【Preferences】>【SSH】>【Enabled】>【OK】或者命令行raspi-config里面的【Interfacing Options】>【SSH】>【Yes】>【Ok】>【Finish】。当然与其它
Linux
操作系统一样,也可以直接使用systemctl命令使能并运行
SSH 服务:
1 | ➜ sudo systemctl enable ssh |
树莓派 SSH 启动完成之后,打开计算机上的Putty或者其它 SSH
远程连接工具,输入树莓派的 IP 地址以及 SSH
默认的端口号22即可实现连接:
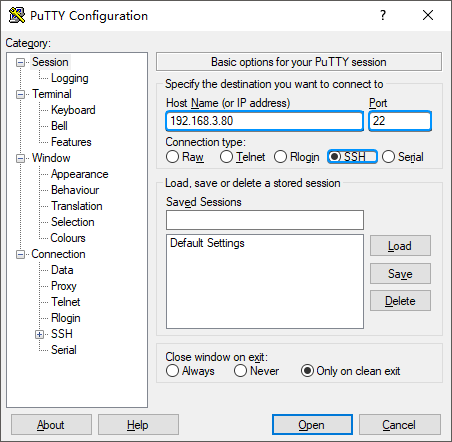
注意:开启 SSH 服务之后,同时也就可以方便的使用 SFTP(安全文件传输协议,SSH File Transfer Protocol)服务,当然这需要借助 WinSCP 或者 MobaXterm 与 Filezilla 等专用客户端工具。
scp 远程拷贝命令
树莓派提供了scp命令用于通过 SSH
传输文件,当然前提是需要知道树莓派在当前局域网里的 IP
地址。scp命令后面紧跟当前计算机上需要传输的文件路径,以及树莓派的用户名@IP地址,最后的冒号:后面则是目标文件在树莓派主目录下的放置路径,缺省是放置当前用户目录的根路径下。
1 | ➜ scp test.txt pi@192.168.3.80: |
上面的命令会将计算机上的test.txt文件传输至 IP
地址为192.168.3.80的pi用户根目录下面。
1 | ➜ scp test.txt pi@192.168.3.80:Downloads/ |
将text.txt传输至pi用户根目录下的Downloads文件夹下面。
1 | ➜ scp pi@192.168.3.80:Downloads/hank.txt ./ |
将树莓派上pi用户根目录下Downloads文件夹内的hank.txt文件传输到当前计算机的./路径。
注意:
scp命令可以同时上传多个文件,文件名称当中也可以使用通配符,如果文件名中带有空格,则必须使用引号""将文件名称括起来。
rsync 文件同步命令
rsync命令用于在树莓派和Linux
计算机之间通过 SSH
同步目录以及里面的文件,首先在本地计算机上建立一个用于保存截图的screenshot目录:
1 | ➜ mkdir screenshot |
Raspberry Pi
捕获的照片将会自动保存在camera目录下面,然后在本地计算机执行下面的命令,将这些截图自动同步到本地计算机上的screenshot目录。
1 | rsync -avz -e ssh pi@192.168.3.80:camera/ screenshot/ |
SSHFS 文件系统
SSHFS 是 SSH 文件系统(SSH Filesystem)的简称,可在安装 Linux 宿主系统的计算机上,通过 SSH 会话将树莓派 Raspbian 上的目录挂载至本地计算机。
首先,执行如下命令在计算机上安装 SSHFS:
1 | ➜ sudo apt install sshfs |
然后,在本地计算机上建立一个目录:
1 | ➜ mkdir hank |
将 Raspberry Pi 的文件系统挂载至这个目录:
1 | ➜ sshfs pi@192.168.3.80: hank |
最后,进入本地计算机的hank目录,就可以查看到映射过来的树莓派\home主目录下的文件。
Samba 文件共享
Samba
基于SMB/CIFS网络协议,不同设备之间可以通过该协议共享访问文件、串行端口等,这里通过它将
Windows 10 系统设备上的共享文件夹挂载至树莓派。
下面的命令会自动安装 Samba 作为服务器和客户端的全部必需组件:
1 | ➜ sudo apt install samba samba-common-bin smbclient cifs-utils |
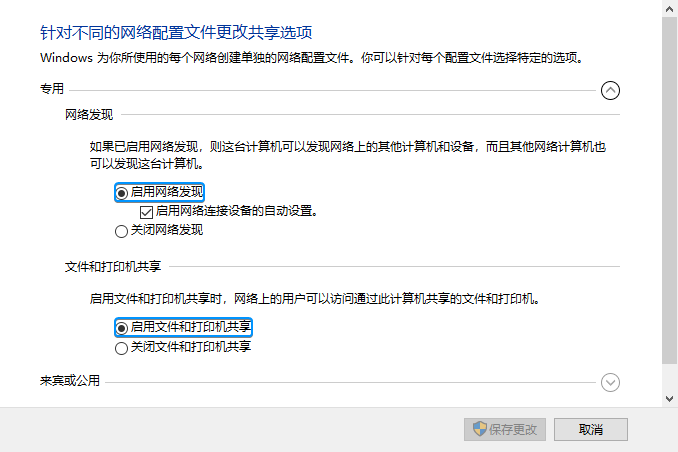
Windows ➜ Raspbian
接下来,设置 Windows 10
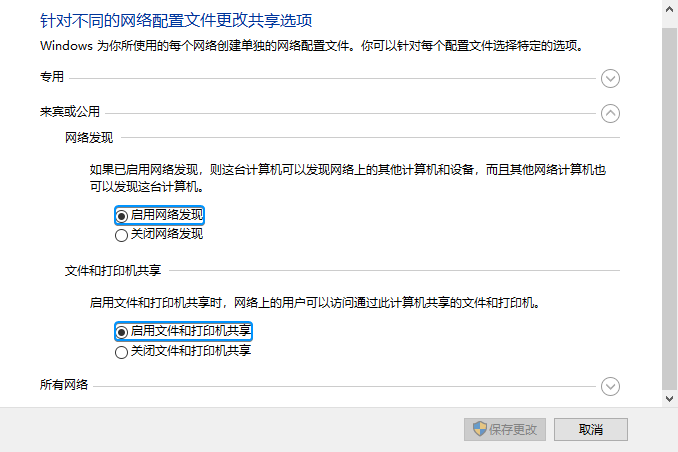
操作系统的文件共享状态,打开控制面板并依次进入网络和共享中心\高级共享设置,然后分别勾选专用以及来宾或公用网络下面的【启用网络发现】和【启用文件和打印机共享】:
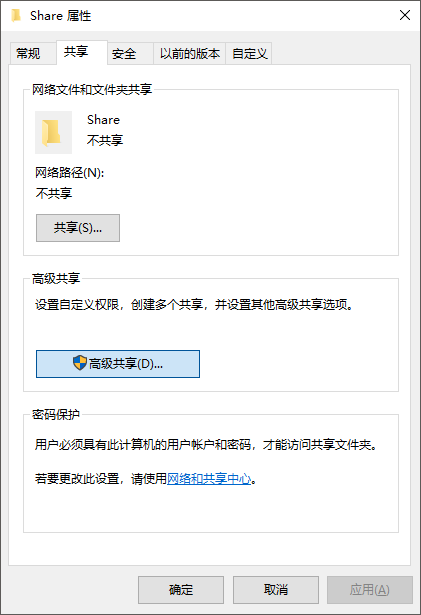
然后在 Windows 10 操作系统的 D
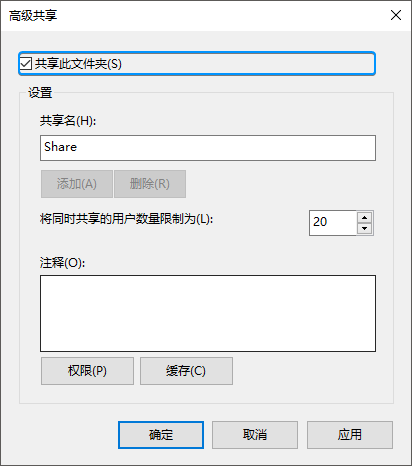
盘创建一个Share文件夹,并鼠标右键选择属性,进入【共享】选项卡设置如下属性:
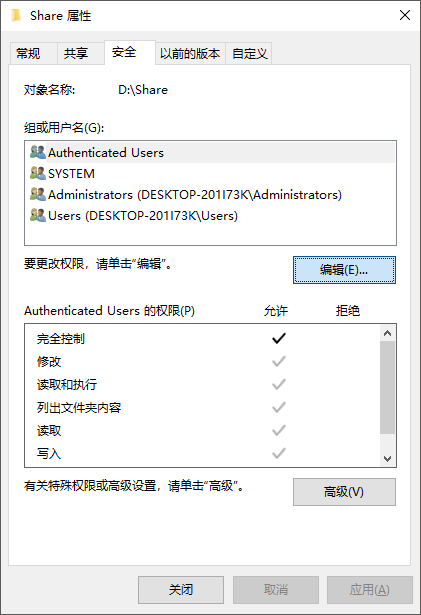
最后进入【安全】选项卡,更改权限状态为【完全控制】:
接下来的步骤,将在 Raspberry Pi 上进行,在 Raspbian
上建立一个windows-share目录,然后将 Windows 10
上建立的Share文件夹通过 Samba 挂载至该目录下:
1 | ➜ sudo mount.cifs //192.168.3.81/Share /home/pi/windows-share -o user=hank |
注意:上面命令具体的格式应为
sudo mount.cifs Windows共享目录 Raspbian共享目录 -o user=Windows用户名,后续输入的密码也应为 Windows 的密码。
完成以上操作之后,就可以在 Raspberry Pi 查看到 Windows 10
的Share文件夹里共享的内容。
Raspbian ➜ Windows
首先在 Raspbian
的/home主目录里面创建一个raspbian-share目录,然后编辑
Samba 配置文件smb.conf通知 Raspbian 共享该目录:
1 | ➜ sudo vim /etc/samba/smb.conf |
在配置文件的末尾,添加如下内容完成共享,并为远程用户提供读/写权限:
1 | [raspbian-share] |
注意:可以在
smb.conf文件当中查询workgroup配置项,如有需要,可以将其更改为本地 Windows 网络工作组的名称。
重新 Samba 服务以使配置生效:
1 | ➜ sudo /etc/init.d/smbd restart |
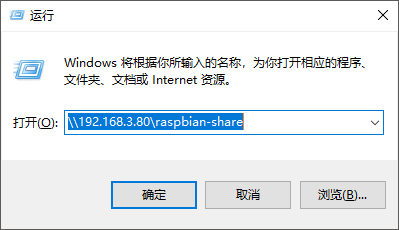
回到 Windows 10 操作系统当中,按下【Win + R】键运行如下命令打开 Raspbian 共享文件目录:
1 | ➜ \\192.168.3.80\raspbian-share |
NFS 网络文件系统
NFS 网络文件系统(Network File-System)本质上是一种基于 RPC(远程过程调用)协议的文件系统,用于通过网络让不同设备与系统实现双向共享,就像访问操作系统的本地磁盘一样。首先,安装 NFS 服务器端和客户端:
1 | ➜ sudo apt-get install nfs-kernel-server nfs-common |
然后,编辑/etc/exports文件配置 NFS
所要共享给其它设备和系统的目录:
1 | ➜ sudo vim /etc/exports |
下面配置将/workspace工作区目录设置为 NFS
共享目录,其中*表示允许任意 IP
进行访问,insecure表示允许使用1024以上的端口传输数据,rw表示可以进行读写访问,sync则表示同步,no_root_squas表示root用户具有根目录的完全访问权限。
1 | # /etc/exports: the access control list for filesystems which may be exported |
修改完成以后保存,同时赋予/workspace目录最为宽松的读写权限:
1 | ➜ sudo chmod -R 777 /workspace |
下面两条命令用于启动或者重新启动 NFS 服务:
1 | ➜ sudo /etc/init.d/nfs-kernel-server start |
如果共享 NFS 服务的设备为 Linux,则使用如下命令格式:
1 | ➜ sudo mount -t nfs 192.168.199.199/workspace /mnt -o nolock |
如果共享 NFS 服务的设备为 Windows,则需要先行打开 Windows
控制面板\所有控制面板项\程序和功能上的 NFS 服务支持:
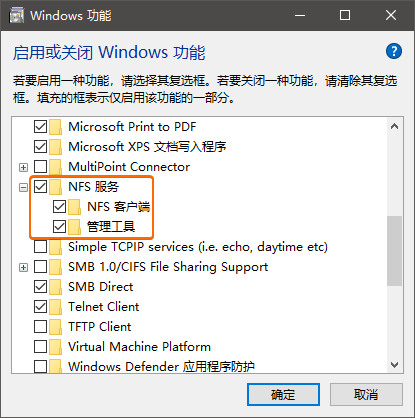
然后再通过如下命令挂载 Raspberry Pi 4B 提供的 NFS 共享服务至 X 盘:
1 | λ mount \\192.168.199.199\workspace X: |
搭建 FTP 服务
FTP 是文件传输协议(File Transfer Protocol)的英文缩写,树莓派通常采用 Pure-FTPd 搭建 FTP 服务器,通过下面命令可以直接安装:
1 | ➜ sudo apt install pure-ftpd |
首先,创建一个ftpgroup用户组以及一个ftpuser用户,同时确保该用户没有登陆权限以及
Home 目录:
1 | ➜ sudo groupadd ftpgroup |
然后,在用户主目录/home/pi下面新建一个FTP文件夹,并且授予ftpuser该目录的访问权限:
1 | ➜ sudo mkdir /home/pi/FTP |
接着再建立一个名为upload的虚拟用户,并且将其映射至ftpuser和ftpgroup,同时设置其主目录为/home/pi/FTP,最后设置其密码:
1 | ➜ sudo pure-pw useradd upload -u ftpuser -g ftpgroup -d /home/pi/FTP -m |
再通过下面命令建立一个虚拟用户数据库:
1 | ➜ sudo pure-pw mkdb |
最后,通过建立/etc/pure-ftpd/conf/PureDB文件的链接来定义一种认证方法,注意下面命令中的60只是一个演示值,实际使用的时候应当尽量缩小这个值。
1 | ➜ sudo ln -s /etc/pure-ftpd/conf/PureDB /etc/pure-ftpd/auth/60puredb |
完成上述步骤以后,重新启动 Pure-FTPd 步骤:
1 | ➜ sudo service pure-ftpd restart |
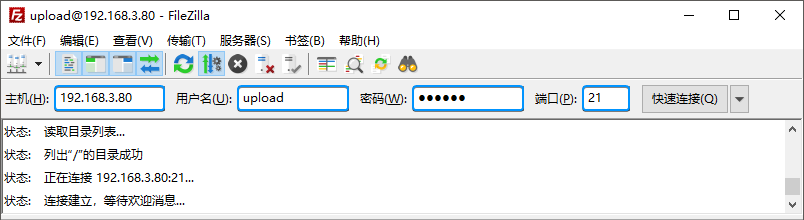
最后打开计算机上的 Filezilla
客户端工具,采用上面建立的虚拟用户upload连接至树莓派上搭建的
FTP 服务:
部署 Nginx Web 服务
在 Raspbian 终端里输入以下命令安装 Nginx 软件包:
1 | ➜ sudo apt install nginx |
然后就可以使用如下命令启动 Web 服务器:
1 | ➜ sudo /etc/init.d/nginx start |
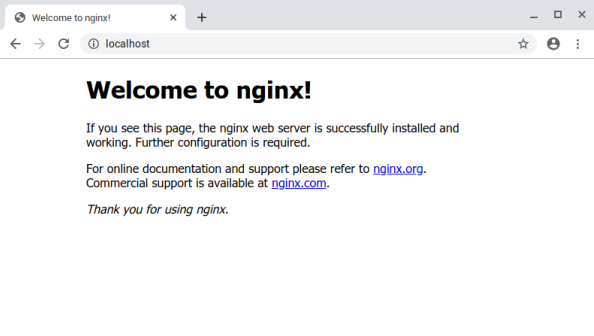
使用 Web
浏览器打开http://localhost/地址,即可以查看到如下 Nginx
欢迎页面:
默认情况下 Nginx 将主页放置在 Raspbian
的/var/www/html/index.nginx-debian.html文件内,可以根据需要编辑或者替换这个文件,也可以修改
Nginx
的配置文件/etc/nginx/sites-available/default里的root属性设置默认页面的位置。
1 | server { |
crontab 定时任务命令
crontab命令用于配置计划任务,可以让计划命令或者脚本以固定间隔时间运行,包括root在内的每个用户都拥有自己的crontab命令空间。运行crontab -l命令可以在控制台列出当前保存的计划任务,在控制台输入crontab -e命令则可以编辑计划任务列表,下面的脚本用于在每天午夜运行backup.sh脚本:
1 | 0 0 * * * /home/pi/backup.sh |
如果需要在 Raspbian
启动时运行某个命令,则计算任务列表中要采用@reboot代替时间和日期,例如下面命令会在
Raspbian 重新启动时,运行指定的 Python 脚本:
1 | 0 0 * * * /home/pi/backup.sh |
如果希望 Raspbian
启动以后,在后台运行指定的命令,那么需要在命令最后添加一个空格以及一个&符号,如下所示:
1 | @reboot python /home/pi/myscript.py & |
rc.local 自启动文件
除了使用crontab命令启动定时任务以外,还可以将这些任务添加至/etc/rc.local自启动文件当中。
1 | ➜ sudo vim /etc/rc.local |
必须使用root权限进行该文件的编辑,并且必须将自启动命令放置在exit 0语句的上方。
1 |
|
如果自启动命令循环运行不退出,则必须在命令末尾添加&符号,使其运行在单独的进程,而不至于阻塞
Raspbian 的启动过程。
1 | python3 /home/pi/myscript.py & |
此外,命令尽量采用绝对路径,例如/home/pi/myscript.py而非myscript.py。而且由于所有命令都会以root用户执行,这样可能会导致意外的行为,例如命令中通过mkdir创建的文件夹将会具有root权限,其它用户无法正常访问。
systemd 系统服务
systemd是 Linux
上的系统服务管理器,可以用于启动守护进程,如果需要让
Raspbian
启动时运行某个命令或者程序,就可以通过该命令将其添加为一项服务。
首先,为系统服务建立一个.service文件,例如myscript.service:
1 | [Unit] |
上面的代码会在/home/pi/myscript工作目录下运行main.py脚本,将上述代码文件复制到/etc/systemd/system目录下面:
1 | ➜ sudo cp myscript.service /etc/systemd/system/myscript.service |
复制完成以后就可以通过如下命令将其启动为一个系统服务:
1 | ➜ sudo systemctl start myscript.service // 将脚本启动为系统服务 |
如果启动和停止工作正常,就可以通过如下命令将该系统服务作为自启动任务之一:
1 | sudo systemctl enable myscript.service |
上面这个命令还可以用于重新启动服务,甚至是禁用其作为自启动项目。
基于 Python 的 gpiozero
树莓派基金会提供了开源 Python 库 gpiozero,以便于方便快捷的操作 GPIO 资源。
例如,使用 LED
对象上的on()、off()、toggle()、blink()方法可以方便的控制发光二极管的亮灭,下面代码假设发光二极管连接到了树莓派的
GPIO17 引脚上。
1 | from gpiozero import LED |
利用 Button
对象提供的is_pressed、is_held属性,when_released、when_pressed
回调,
wait_for_press()、wait_for_release()函数可以方便的使用按键,下面代码假设一个物理按键连接到了GPIO2引脚:
1 | from gpiozero import Button |
下面同时利用发光二极管和按键进行实验,三组代码最终呈现的效果都是等效的:
1 | # 采用 is_pressed 属性的方式 |
基于 C 的 wiringpi
wiringpi 是一款基于 GNU LGPL v3
许可证的 GPIO 接口库,从v2.52版本以后就已经对 Raspberry Pi
4B 提供了完善的支持,简单的通过下面命令可以快速的执行安装:
1 | ➜ cd /tmp |
安装完成后,执行如下命令测试安装是否正确:
1 | ➜ gpio -v |
接下来采用 C 语言编写一个可以通过控制 GPIO 来实现 LED 闪烁的程序:
1 |
|
然后采用 Raspbian 上提供的 GCC 进行编译与运行:
1 | ➜ gcc -Wall -o blink blink.c -lwiringPi |
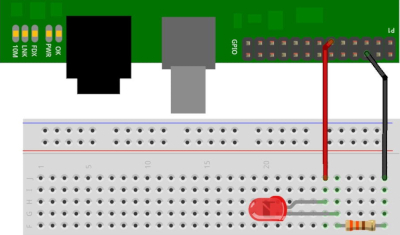
然后将树莓派 GPIO 端口(第 11
位物理引脚,也即BCM pin 17)通过一枚330Ω电阻与一枚5mm的
LED 发光二极管连接,就可以看到 LED 每间隔 1 秒进行闪烁。
安装 dlib & face_recognition
使用如下命令安装所需的依赖库。
1 | ➜ sudo apt-get install build-essential cmake gfortran git wget curl graphicsmagick libgraphicsmagick1-dev libatlas-dev libavcodec-dev libavformat-dev libgtk2.0-dev libjpeg-dev liblapack-dev libswscale-dev pkg-config python3-dev python3-numpy python3-pip zip |
如果你正在使用相机,还需要安装 Python
库picamera以及数组支持。
1 | ➜ sudo apt-get install python3-picamera |
临时设置更大的swap文件尺寸,防止编译dlib编译时由于存储空间有限而导致失败。
1 | ➜ sudo vim /etc/dphys-swapfile |
下载和安装dlib19.6:
1 | ➜ mkdir -p dlib |
安装face_recognition:
1 | ➜ sudo pip3 install face_recognition |
完成dlib的安装以后,恢复swap文件尺寸为默认值。
1 | ➜ sudo vim /etc/dphys-swapfile |
下载face_recognition示例代码:
1 | ➜ git clone --single-branch https://github.com/ageitgey/face_recognition.git |
注意:执行
example下的示例代码之前,如果使用的是板载 CSI 接口摄像头,则必须执行sudo raspi-config打开树莓派软件配置工具,依次选择【Interfacing Options -> P1 Camera】使能该摄像头。
如果需要使用桌面 GUI,则还需要再安装 PIXEL:
1 | ➜ sudo apt-get install --no-install-recommends xserver-xorg xinit raspberrypi-ui-mods |
安装 OpenCV 3.4.9
本小节详细记录了在 树莓派 4B
上源码编译安装opencv 3.4.9和opencv_contrib-3.4.9的完整步骤。
安装科学计算库 numpy
1 | ➜ sudo pip3 install numpy |
将根目录扩大至整个 SD 卡
本步骤会将系统根目录扩展至整个存储卡,充分利用其存储空间,否则可能会导致后续命令执行出现卡死。
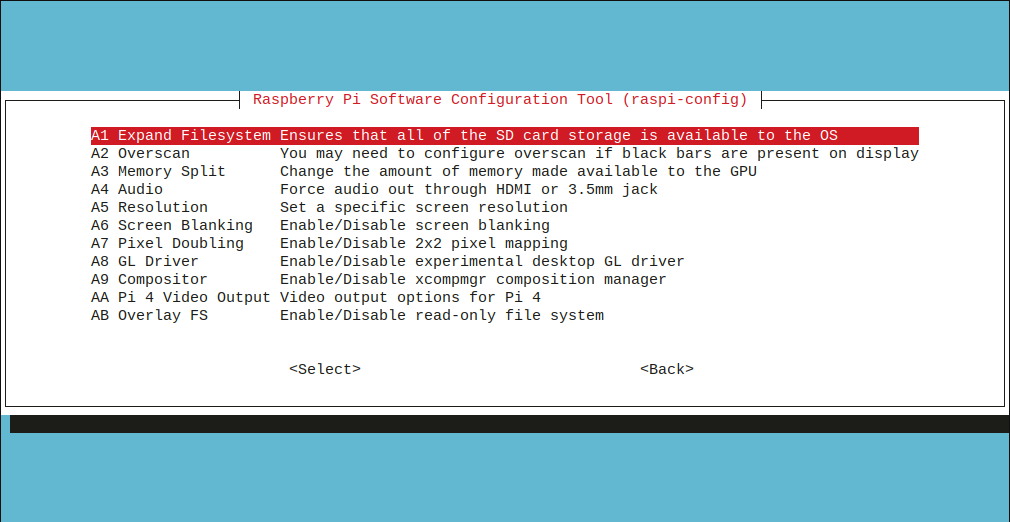
1 | ➜ sudo raspi-config |
选择【7 Advanced Options】以后,再选择【A1 Expand Filesystem...】确认将 Raspbian 文件系统扩展至全部的存储卡空间。
完成设置以后,重启 RaspberryPi 4B;
1 | ➜ sudo reboot |
注意:采用 NOOBS 方式安装的 Raspbian 已经默认将文件系统扩展至全部空间,因此可以跳过本步骤。
安装 OpenCV 第三方依赖
1 | ➜ sudo apt-get install build-essential git cmake pkg-config -y |
下载 OpenCV
从官方 Github 仓库下载 OpenCV 以及额外的 OpenCV Contrib
源码包至/home/pi/Downloads。
1 | ➜ cd /home/pi/Downloads |
配置 CMake
建立 build 目录
1 | ➜ cd /home/pi/Downloads/opencv-3.4.9 |
1 | ➜ cmake -D CMAKE_BUILD_TYPE=RELEASE -D CMAKE_INSTALL_PREFIX=/usr/local -D INSTALL_C_EXAMPLES=ON -D INSTALL_PYTHON_EXAMPLES=ON -D OPENCV_EXTRA_MODULES_PATH=/home/pi/Downloads/opencv_contrib-3.4.9/modules -D BUILD_EXAMPLES=ON -D WITH_LIBV4L=ON PYTHON3_EXECUTABLE=/usr/bin/python3.5 PYTHON_INCLUDE_DIR=/usr/include/python3.5 PYTHON_LIBRARY=/usr/lib/arm-linux-gnueabihf/libpython3.5m.so PYTHON3_NUMPY_INCLUDE_DIRS=/home/pi/.local/lib/python3.5/site-packages/numpy/core/include .. |
开始编译
执行 make 命令对源码包进行编译:
1 | ➜ cd /home/pi/Downloads/opencv-3.4.9/build |
执行 make install 安装编译程序:
1 | ➜ sudo make install |
解决 .i 文件依赖
由于 Raspberry Pi 4B
上编译opencv 3.4.9以及opencv_contrib-3.4.9的依赖过程当中,由于国内网络屏蔽造成的部分.i文件无法正常下载,而在执行sudo make install命令时出现~/opencv_contrib/modules/xfeatures2d/src/boostdesc.cpp:673:20: fatal error: boostdesc_bgm.i: No such file or directory等一系列错误信息。
通过打开/home/pi/Downloads/opencv/build目录(即源码编译后的二进制文件所在目录)下的CMakeDownloadLog.txt日志文件,搜索如下缺失的.i文件名称:
1 | boostdesc_bgm.i |
解决办法是找到对应的下载地址,完成下载后将其拷贝至/home/pi/Downloads/opencv_contrib-3.4.9/modules/xfeatures2d/src目录下面,重新执行sudo make install即可解决报错问题。
注意:上述
.i依赖文件已经全部放入笔者 Github 里面的 raspberry-pi-opencv-patch 项目下面,可以直接下载使用,适用于opencv 3.4.9和opencv_contrib-3.4.9版本的编译。
解决 .hpp 头文件路径错误
对于在执行sudo make install命令过程当中,出现的无法找到cuda.hpp、xfeatures2d.hpp、nonfree.hpp头文件的情况,只需要用文件查找命令,在opencv_contrib-3.4.9目录下查找这些文件所在的路径:
1 | ➜ find -name "xxx.hpp" |
然后将上述头文件所在的/home/...路径名,添加至报错的.cpp源代码文件的#include预包含指令里面,即可以解决问题。
验证安装结果
进入python3命令行模式,并进行如下操作验证安装是否成功。
1 | ➜ python3 |
pybluez 蓝牙操作
安装pybluez以及其所依赖的蓝牙协议栈bluez和库文件libbluetooth-dev。
1 | ➜ sudo apt-get install bluez libbluetooth-dev |
修改bluetooth.service配置文件为如下内容:
1 | ➜ sudo vim /lib/systemd/system/bluetooth.service |
1 | [Unit] |
重新启动 Raspberry Pi 使设置生效,然后选择 Raspbian
系统右下方蓝牙菜单上的【Make
Discoverable】让设备蓝牙处于可查找状态,然后采用sudo权限运行如下的示例程序sudo python3 rfcomm-server.py。注意这里必须以sudo权限运行程序,否则会报出下面错误信息:
1 | Traceback (most recent call last): |
如果树莓派无法与手机建立蓝牙音频连接,则需要执行如下操作解决:
1 | ➜ sudo apt-get install pulseaudio-module-bluetooth |
如果工作依然不正常,则再执行如下命令重新启动pulseaudio:
1 | ➜ pulseaudio -k |
rfcomm-server.py
1 | import bluetooth |
rfcomm-client.py
1 | import sys |
玩转树莓派 Raspberry Pi 开源硬件